
How to Read Wood
This series · What the Eye Does, What the Mind Does · No. 4 (6 episodes total) Ongoing
"Some things stay invisible until you look at them apart."
Originally written in Korean and translated into English with the help of AI. Read the original
In Meiji 37 (1904), a man named Saito Hyojiro published a carpenter's manual called Nihon Kaoku Kozo (The Structure of the Japanese House). It lays out, start to finish, how to build a Japanese house, and I had opened it looking for window-and-door dimensions — but I ended up lingering on the very first chapter.
I'd assumed a carpenter's manual would open with dimensions or joinery, the way you'd expect. Instead, this book's first chapter, "Introduction," opens with a discussion of how to read wood. It runs barely seven pages across six sections, with thirteen accompanying figures. Let's go through it in order.
1. Belly and Back
The book opens with a warning right from the start: wood has a belly and a back, and getting this wrong when you use it has a great deal to do with whether the piece ends up strong or weak.
It lays out how to tell them apart. For a tree grown on flat ground, the side that got less sun and grew more slowly is the belly, and the side that got more sun and grew well is the back. The back side is where the branches were thickest, so it also carries more knots. For a tree grown on a slope, the uphill-facing side is the belly and the downhill-facing side is the back — and such a tree, even after felling, tends to already carry a slight bow, which the book says makes telling the two apart not difficult.
It also sets out the order of dressing. A felled log is set on sawhorses belly-up, a chalk line is struck, both sides are roughed out with an axe (somakezuri), and then the piece is turned roughed-face-up to dress the belly and back.
Of the timbers dressed this way, roughly those six sun square or smaller are called oshikaku and used as-is, at size, for posts and purlins. Those seven sun square or larger are called nokaku — raw stock to be re-sawn later. To keep nokaku from splitting in transport, both ends were tapered to a point, holes were bored and strung with wire, and the timbers were floated down as rafts.
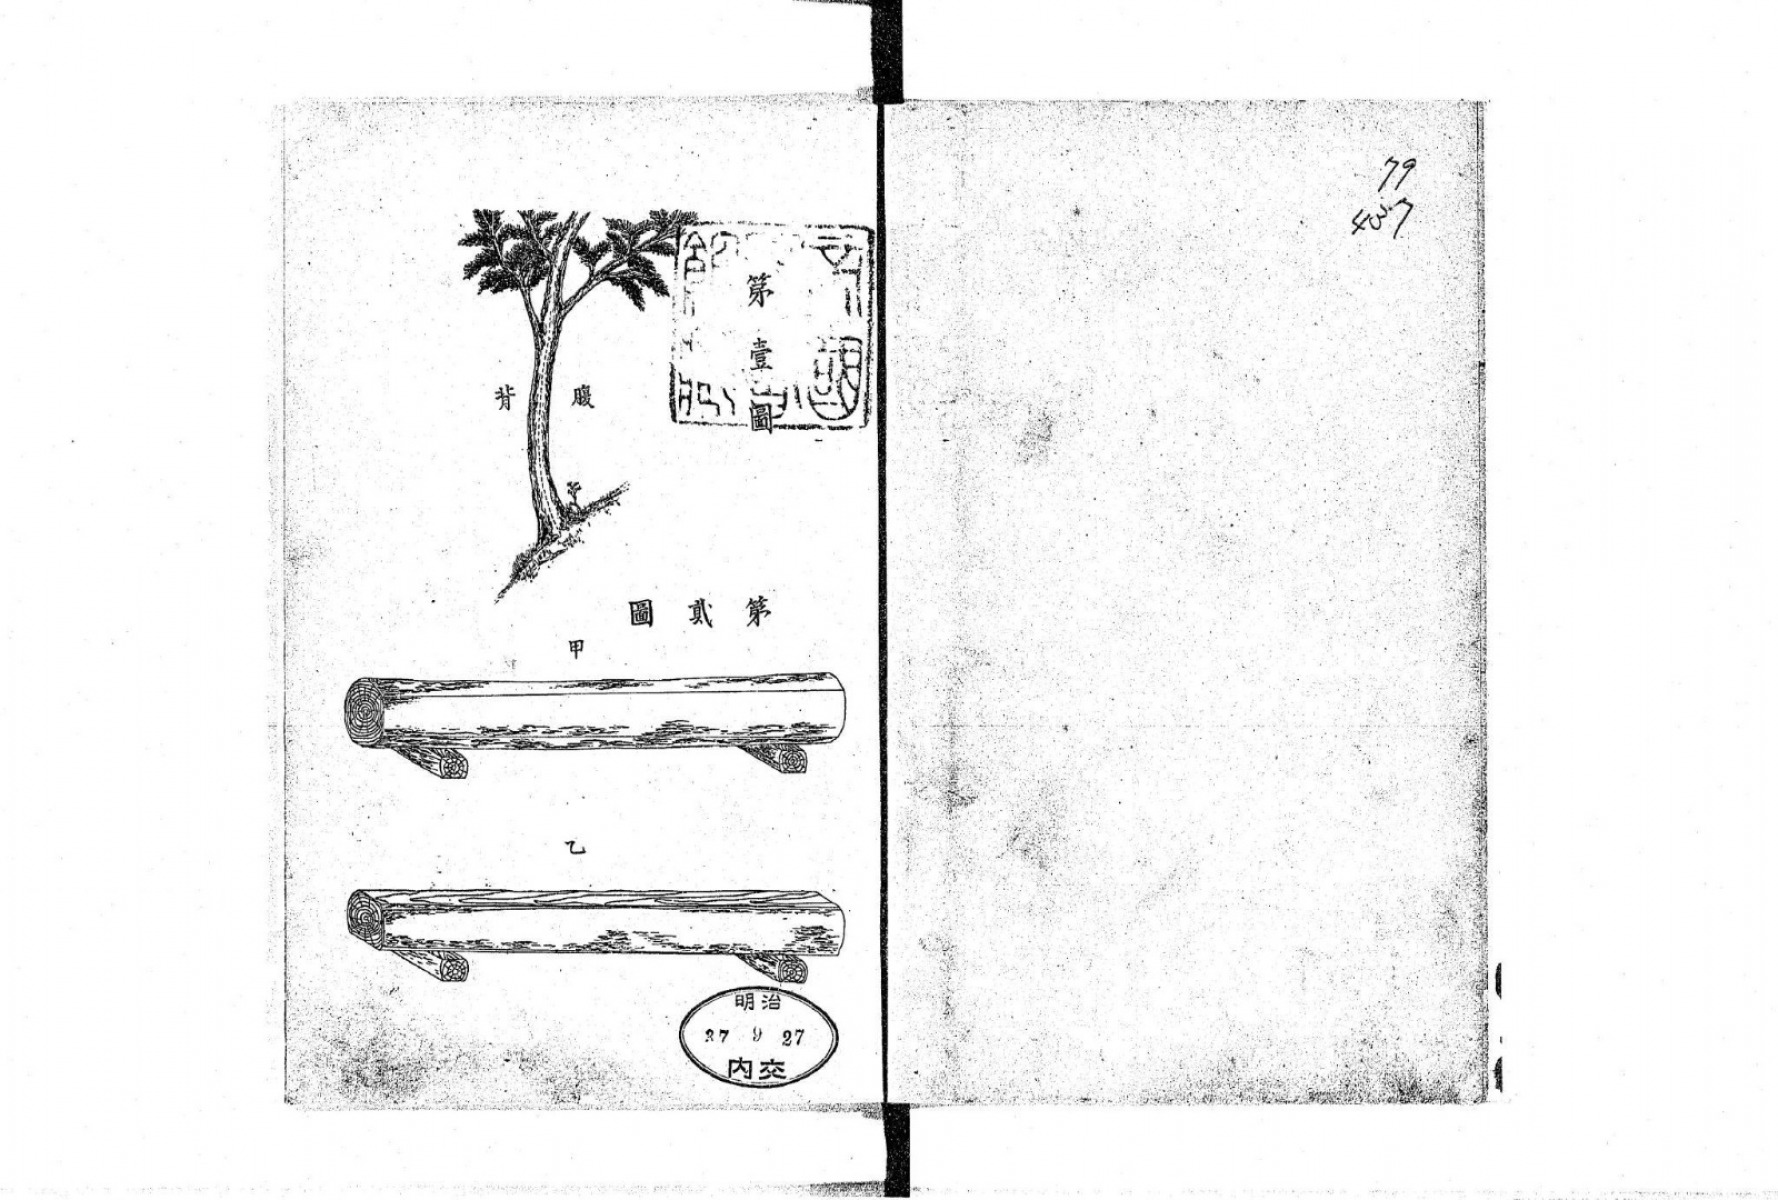
Plate volume, p.3 — Fig.1, belly and back of a tree grown on a slope · Fig.2, somakezuri (axe-roughing)
2. Timber Re-Sawn on the Mountain
Boards and beams whose use was already decided were pre-sawn up on the mountain where the tree was felled, then sent down. Boards are sawn from belly toward back — this is called hon-kidori.
There is also a method of sawing at right angles to the belly-back line. But the book notes that this makes the sawing harder, warps the boards more easily, and lets the unusually hard streak that forms on the back side (ate) end up mixed into the board — making it unsuitable for fine joinery work like windows and doors.
What I found interesting here was how Saito borrows the words of a seasoned sawyer. Sawing at right angles, he says, produces about one go more sawdust per cut than hon-kidori does, for a cut 12–13 shaku long and 1 shaku wide. A lifetime of sawing-by-feel, translated into a volume of sawdust.
3. Face (Kiomote) and Back (Kiura)
For anyone working on windows and doors, this section lands closest to home.
A board has a face side and a back side. The side that faced the bark is kiomote (the "face"); the side that faced the pith is kiura (the "back"). Looking at the end grain, the outer side of the growth rings is the face.
A board bows toward its face as it dries. For that reason, eave boards and verandah decking are laid back-side up, while thresholds and lintels have their grooves cut into the face — because cutting a groove into the back raises cross-grain tearout on both sides of the groove, the book adds helpfully.
Even the direction of the plane stroke is prescribed. On the face, you plane from tip toward butt; on the back, from butt toward tip; planing the wrong way raises torn grain. The back is softer and easier to plane than the face, but tears more readily, so the face is generally the side that gets planed and used. The one exception is shitamiita (weatherboarding), which is planed on the back side, since the knots there are smaller, easier to plane, and longer-lasting.
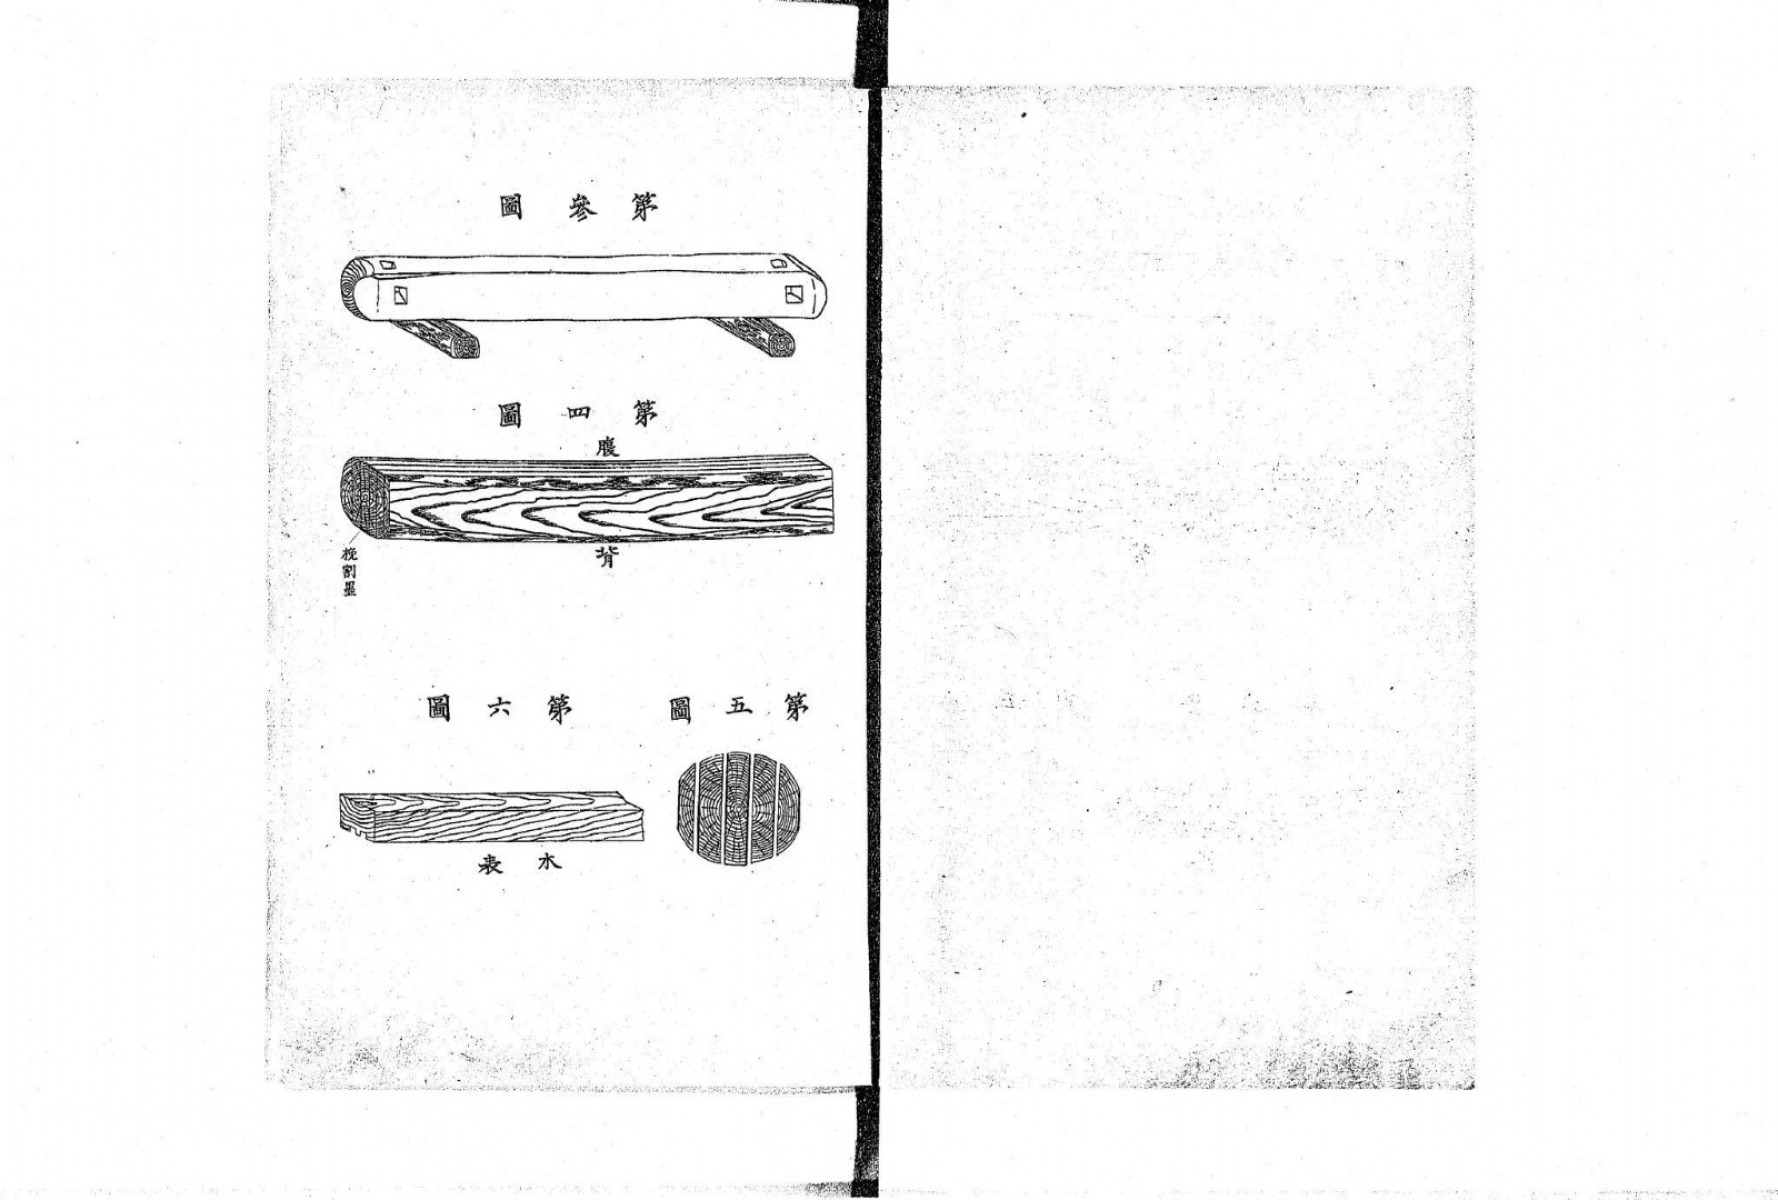
Plate volume, p.4 — Fig.3, oshikaku · Fig.4, chalk-lining for hon-kidori · Fig.5, face and back · Fig.6, groove goes on the kiomote face
4. Making a Squared Timber from a Log
To make a squared timber, the log is laid belly-up across two sawhorses. The pointed ends at both faces are trimmed off, a carpenter's square is stood at the center of each end, and you sight down the length from a distance. If the two squares line up, the piece is plumb (tategami) — strike the centerline chalk mark there, then snap dimension lines on either side, rough out with an adze, and finish the corners with a plane.
For flat timbers of a fixed width, such as sashi-gamoi (through-tenon lintels) or second-floor beams, the method differs slightly. A jogi — a thin straightedge roughly 2–3 shaku long and 2 sun wide, painted black or red on one face — is set on each end. You sight from a distance to see whether the painted edges of the two jogi line up; if they don't, the timber is twisted (hiramigami), and it's dressed until they do. It was a pleasure to read this, since it's exactly the method we use today, setting out winding sticks to check for twist.
The figure also shows the ink pot, ink pen, adze, and plane used for the work.
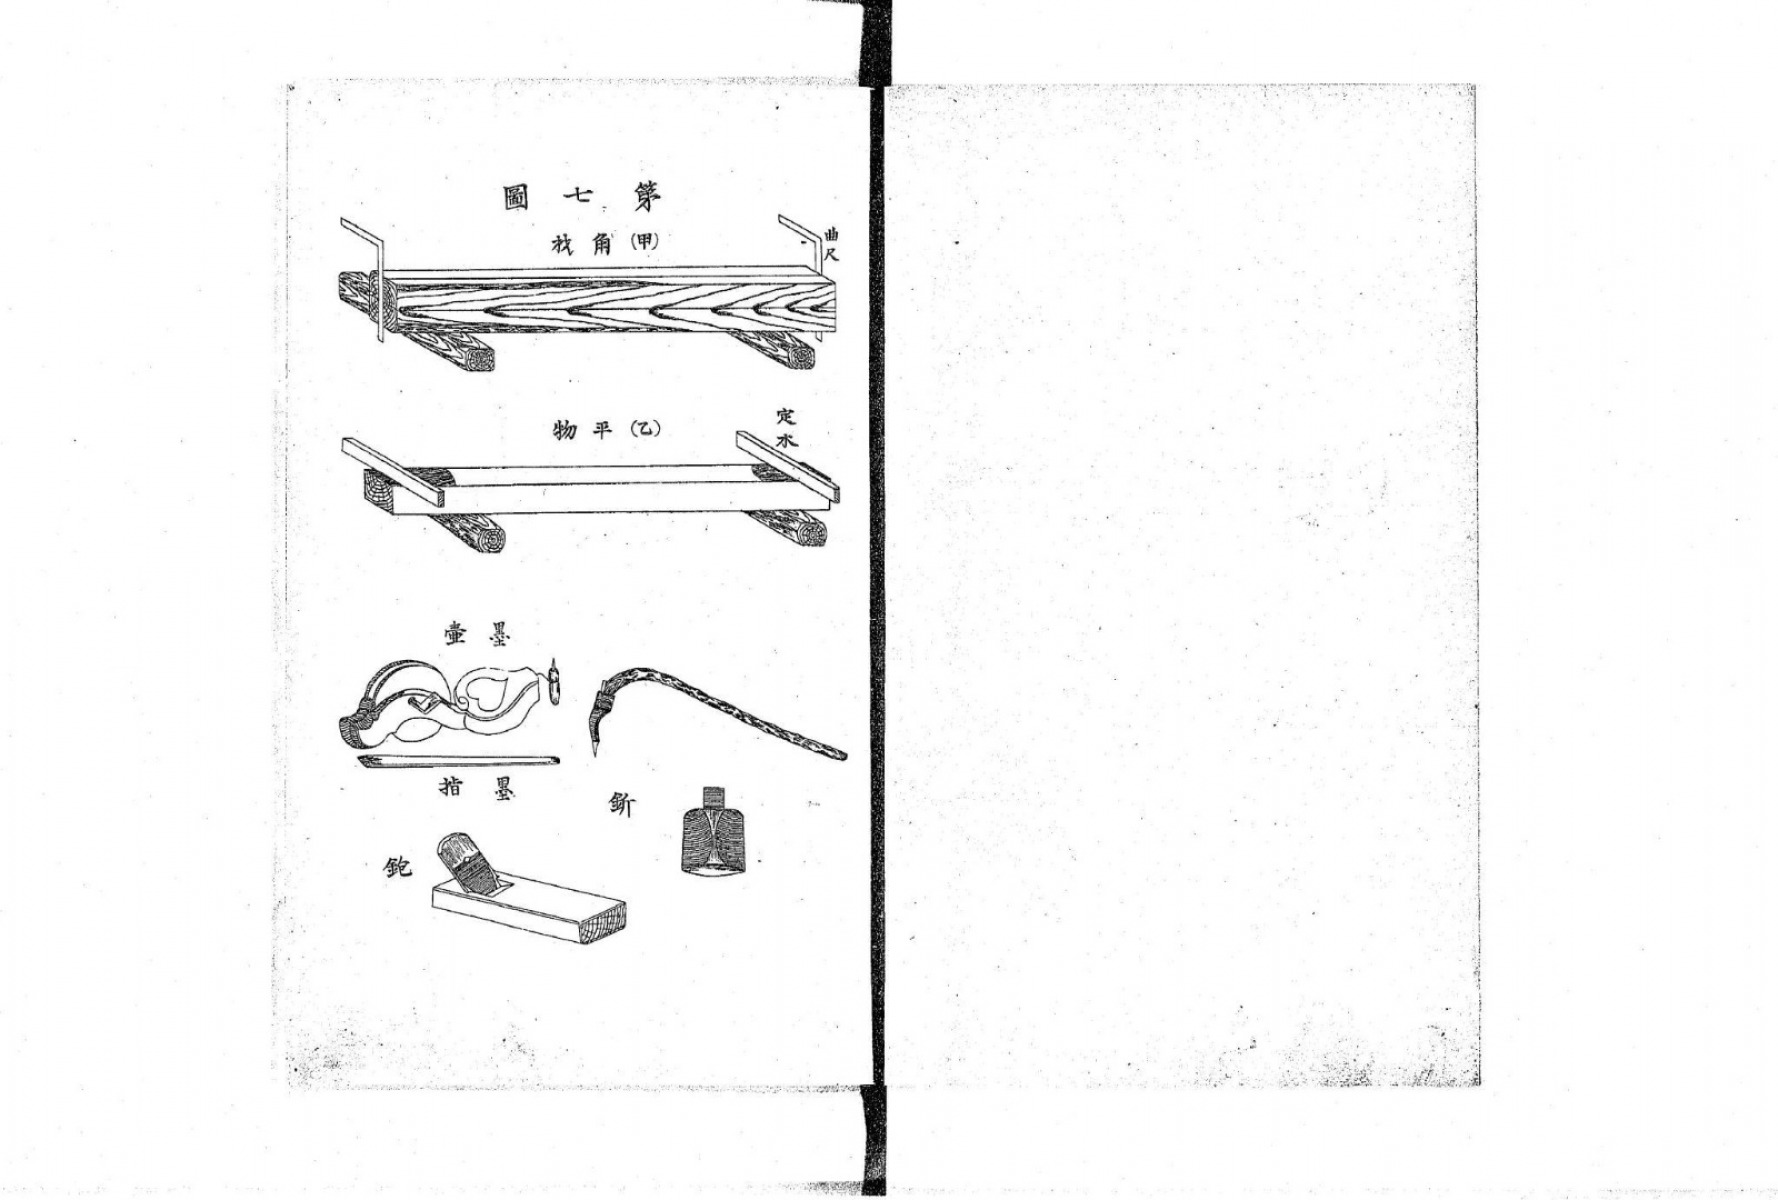
Plate volume, p.5 — Fig.7, (top) squared timber, (bottom) flat timber with jogi · ink pot, ink pen, adze, plane
5. Shrinkage and Sei-wari (Back-Relief Kerf)
As wood dries it shrinks circumferentially, along the growth rings. That's why a sawn board bows toward its face, and why a timber dressed square turns slightly rhomboid as it dries.
To prevent this, a kerf is cut along the back — on the face that will end up hidden once the house is built — and a wedge driven into it; this is sei-wari. In more careful work, hardwood pegs such as oak are driven in at several points along the length so the kerf doesn't reopen. The book adds that a sei-wari kerf only works if it's cut deep enough to reach the pith.
The method for dressing a menkawa-bashira (bark-edge post) for a tea room is covered in the same section. The log's diameter is divided into five parts both ways, the four faces are dressed down to those points, and bark is left at the corners — this is called gobu-ichi-men ("one-fifth face"); divided into four parts instead, it's called shibu-ichi-men.
6. Timbers Hung Horizontally
Horizontal members such as second-floor beams or sashi-gamoi are hung back-side up. If the piece is a round log, the butt end is set slightly lower than the tip end. Done otherwise, the book says, the piece is weaker, and once the building is finished it doesn't look right either.
One exception is noted, though: depending on the building, hanging a second-floor beam back-side down can sometimes do a better job of damping floor vibration. The fact that the book records this exception alongside the rule, rather than just stating a blanket principle, suggests it was written by someone who had spent a long time on real jobsites.
When hanging joists, the book says to notch the joist ends in 5–6 bu so as not to weaken the main beam, and never to cut into the top face of the beam itself.
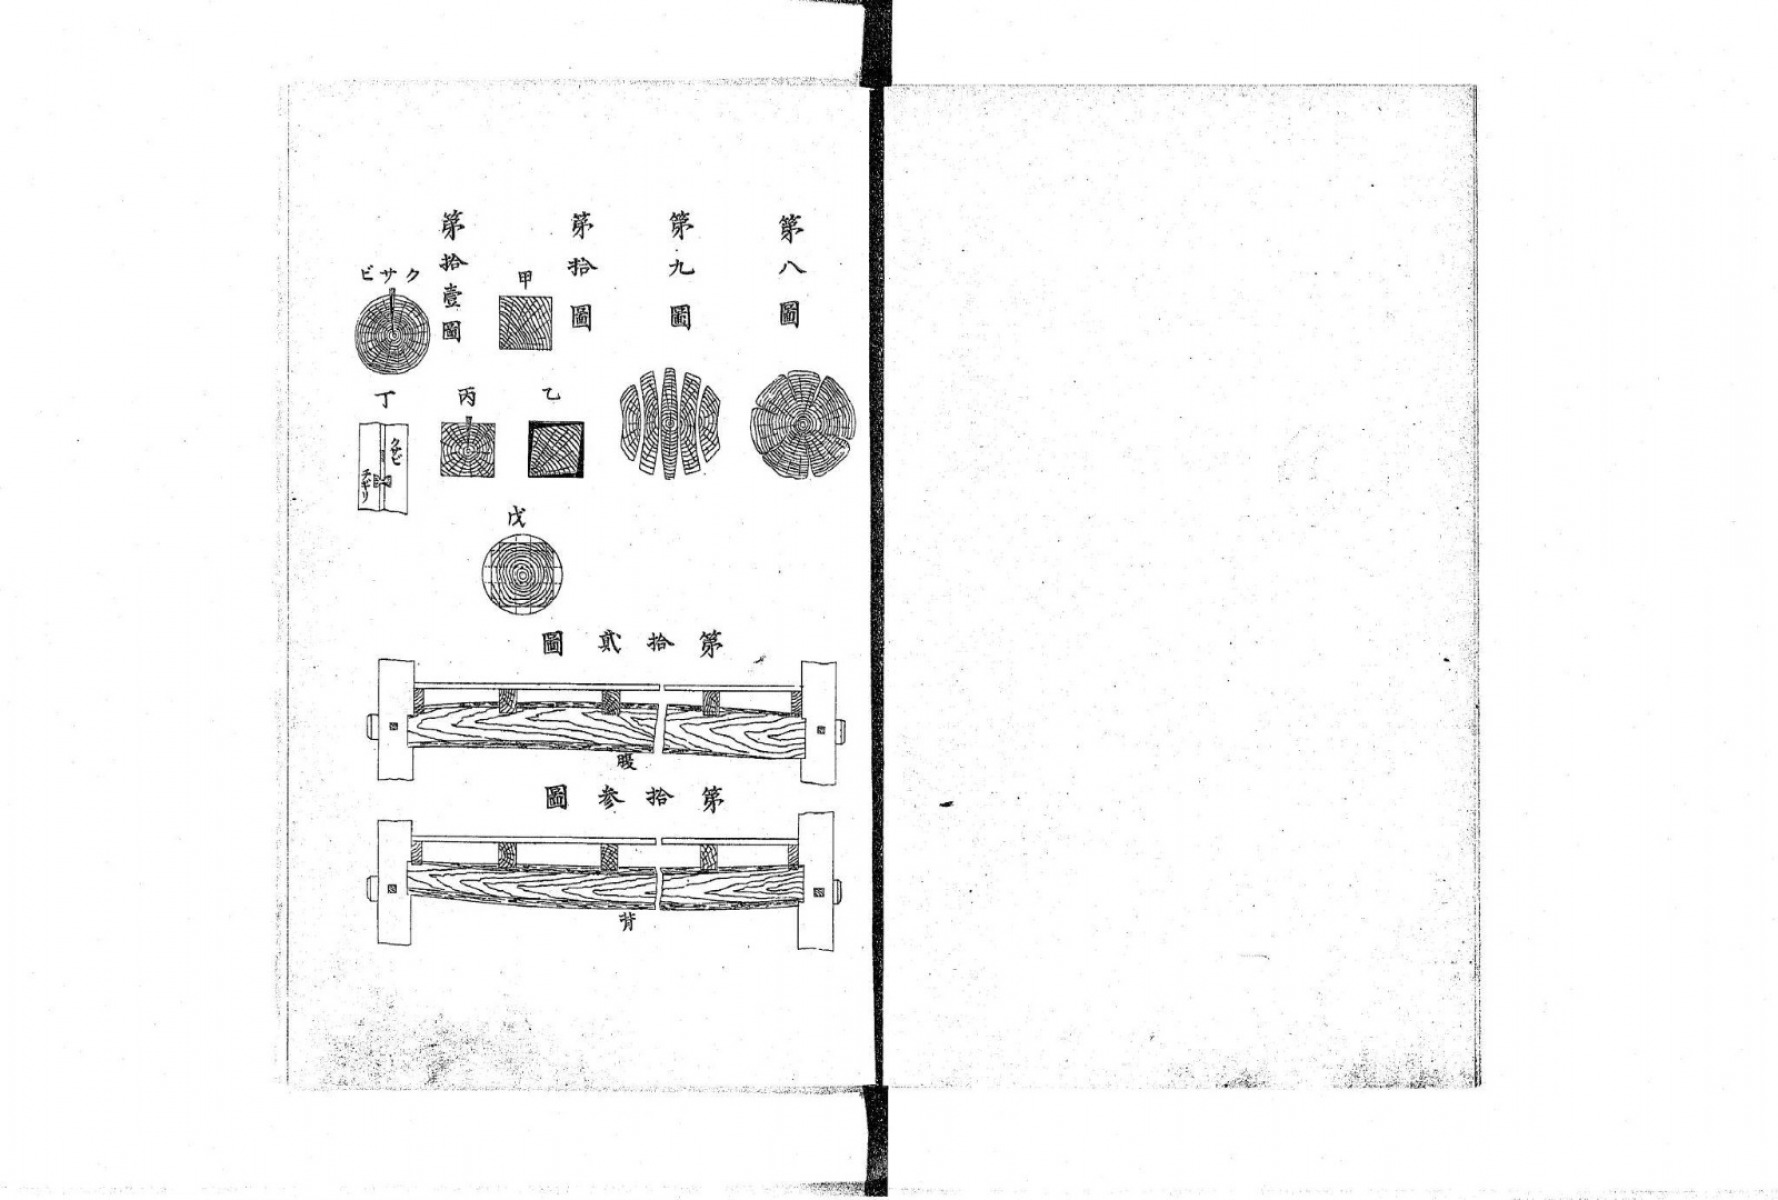
Plate volume, p.6 — Figs.8–11, shrinkage and sei-wari · Figs.12–13, horizontally hung timbers
What Stays in Words, What Stays in the Hand
Having read through all six sections, the feeling is a strange one. None of it is wrong. And yet I don't think reading it would let me stand in front of a tree and actually tell its belly from its back.
Saito seems to have known this too. He recorded only what could be written down as signal and rule — which side carries more knots, which way a board bows, which face takes the groove. There isn't a single line about what makes a piece of wood good, or what it feels like in the hand. Even when he borrows a sawyer's feel for the work, he converts it into a number — "one go of sawdust" — before writing it down.
Japan set these rules apart and placed them at the very front of its manual. On our side, I've had trouble finding anything written that gathers this kind of knowledge together in one place. I suspect that here, rule and sense never came apart to begin with — they passed from a carpenter's hand to the next hand still fused together.
A trace survives in the words themselves. The terms wonggu and malgu, which our carpenters use for the butt and tip ends of a log, come from the Japanese motoguchi (元口) and sueguchi (末口). In 1995 the National Institute of the Korean Language itself listed malgu as a word borrowed from Japanese and suggested replacing it with kkeun-maguri. The names crossed the sea, but it seems how to read the wood by that name did not cross along with them.
The record goes even thinner from there. In 2020, a Korean-language scholar sat down with a somokjang (traditional small-furniture joiner) and compiled a paper on woodworking vocabulary from what he heard directly. Not one of the words back, belly, wonggu, malgu, face, or kiura appears there even as a headword. Grain and knot pass through the body of the text only a few times. Even material gathered by asking a master craftsman directly, it seems, didn't retain these words.
Perhaps that's only natural, in the end. Reading wood isn't something learned through words — it's something known through what the hands go through — so whoever was teaching it would have had little reason to put it into words at all. Even so, looking at the seven pages Saito left behind, I find myself thinking there's real value in writing down whatever can be written down. Let the hand keep what only the hand can remember — but whatever the mind can hold onto is worth holding onto, if it makes the road a little less daunting for whoever is learning.
Sources
- 그림: 斎藤兵次郎 『日本家屋構造』(1904) 図面 3~6쪽, 国立国会図書館デジタルコレクション. 원본 이미지를 손대지 않고 실음.
- 斎藤兵次郎, 『日本家屋構造』, 信友堂, 1904. 상권 構造篇 「(一) 緒論」 1~7쪽, 도판 第1~13図(図面 별책). 국립국회도서관 디지털 컬렉션 https://dl.ndl.go.jp/pid/846328 · https://dl.ndl.go.jp/pid/846327 (퍼블릭 도메인)
- 허철구, 「건설·미술 분야의 일본어와 대응 양상」, 『새국어생활』 5권 2호, 국립국어연구원, 1995. https://www.korean.go.kr/nkview/nklife/1995_2/5_7.html
- 홍기옥, 「한국 목공(木工) 관련 어휘 연구 — 목공 개념·구성, 도구 관련 어휘를 중심으로」, 『인문논총』 77권 3호, 서울대 인문학연구원, 2020, 173~215쪽.
You are free to quote and excerpt posts and records from the Workgroup Pyeongmok blog, as long as you credit the source (pyeongmok.com).
If you spot an error or have any thoughts on this post, please email us at .
Browse the pattern designs at Workgroup Pyeongmok
Go to the Collection